Modify Model
↵ Simulating Observations in CASA
simdata2 can use either or both of a clean component list or an image (cube) of the sky to be observed.
Introduction to Sky Images and CoordinateSystems in simdata
You can use an image from a numerical simulation, or an actual observation - simdata2 makes no distinction. Note that the image represents how the sky appears to the telescope, not how the sky is presented to an observer using the telescope. In other words the image should ideally be noise-free and have infinite resolution. In practice it is usually only necessary for the input noise to be much less than the eventual output noise, and for the input resolution to be at least as sharp as the output resolution. Position and shape errors that fall within what can be resolved are also acceptable. For example a set of CLEAN components representing a galaxy will typically be discontinuous and not resemble a galaxy until it is convolved with a point spread function, but will usually work quite well as input for a simulated observation. In general you can use a deconvolution of a real observation as input for a simulation, even if you do not trust the details of the deconvolution, as long as the input noise level is acceptable.
simdata wants an image in CASA format or a fits file. If you have
- a plain old grid of numbers, we recommend translating that into a fits image. You can use C, perl, IDL, IDL bound into python/casa pyIDL, or translate your idl into python with i2py
- a fits file: the bare minimum header must have these tags
BITPIX  =                  -32 / Number of bits per data pixel
NAXIS   =                    2 / Number of data axes
NAXIS1  =                  100 /
NAXIS2  =                  100 /
- we recommend wcstools, edhead in particular for manipulating fits headers outside of casa. CASA's imhead with mode=list or mode=summary are good for listing the header information of either a fits or CASA image when you're inside CASA.
- If the image has more bits per pixel than needed or wanted, iofits can be used to change the bit depth. CASA, or at least its viewer, is able to handle BITPIX=-64, so this may now be only a disk space issue.
Coordinate Systems
Coordinate systems are probably the most confusing part of dealing with images.
- in a FITS file, there are header keywords that describe the World Coordinate System (WCS). the canonical papers are paperI, paperII, and paperIII. These keywords explain how to translate pixel coordinates xyz into world coordinates e.g. ra, dec, frequency. For example for the x axis, indices range from 1 to NAXIS1. index x_i corresponds in the simplest case to an RA of CRVAL1+CDELT1*(x_i-CRPIX1)
- in CASA, an image has a CoordinateSystem attached to it, which serves the same function, translating the indices of the pixel axes into real world coordinates. The CoordinateSystem is *very* flexible - your pixel axes don't have to be in the same order as the World Coordinate axes for example. The motivated user can get at the CoordinateSystem by opening their image in the ia tool, and working with the ia.coordsys() object.
- simdata2 will make its best attempt to turn your input image into the 4-dimensional image (RA,Dec,Stokes,Spectral) with a CoordinateSystem that it needs to calculate visibilities. If your model doesn't have polarization/Stokes information, we'll add a dummy axis to the image for you. If your image doesn't have spectral information and is just 2-dimensional, not a cube, we'll add a dummy spectral axis for you. If you have input that breaks it, please let me know so I can make it better remy at nrao.edu.
How to use modifymodel
- If all existing pixel axes have World Coordinates of the desired increments and reference values, set modifymodel=False. NOTE: Even with modifymodel=False, simdata2 will still add a Stokes axis if you need one, making the assumption that your image is Stokes I. If you need to add a Spectral axis, even a degenerate (1-element) one, you'll need to use modifymodel=True, and specify incenter and inwidth.
- If you want to relabel one or more axes (e.g. change spatial cell size, or spectral reference frequency, or add information if any of the axes don't have valid World Coordinates), set modifymodel=True.
The subparameters that are shown are (mostly) independent i.e. you can leave the spatial cell as it is in the image, but change the spatial reference direction. You can set spectral information to add a Spectral axis to your 2D continuum sky model image without changing the spatial coordinate system. Or you can change that at the same time.
- you can scale the surface brightness of the image independently of manipulating the CoordinateSystem. set inbright to your desired Jy/pixel if you want to scale the image. (or if your model doesn't have physically sensible units to begin with)
Graphic Output
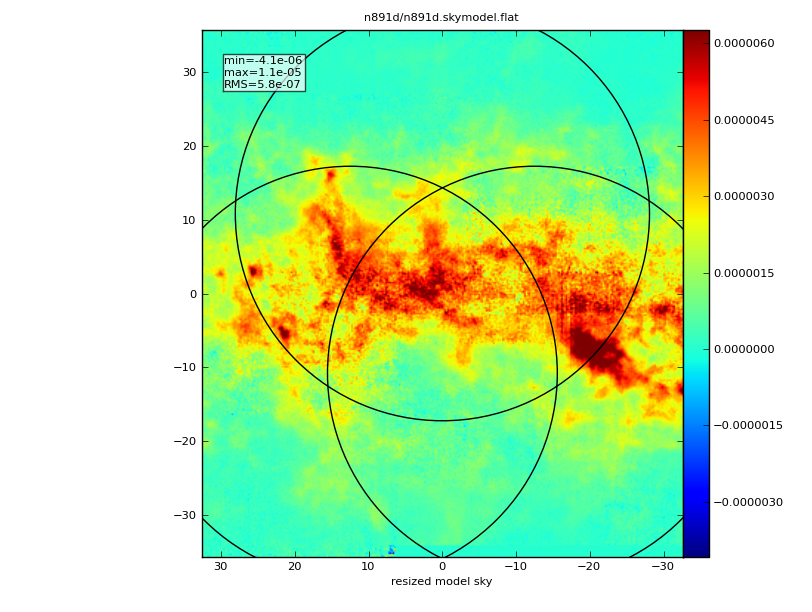
If you have run modifymodel=True or setpointings=True, and you have graphics turned on, you'll see a moment0 image of your scaled sky model, with pointings overlaid on it as circles of the size of the primary beam:
