Antenna List: Difference between revisions
| Line 4: | Line 4: | ||
<tt> | <tt> | ||
CASA <10> repodir=os.getenv("CASAPATH").split(' ')[0]+"/data/alma/simmos/"</tt> | CASA <10> repodir=os.getenv("CASAPATH").split(' ')[0]+"/data/alma/simmos/" | ||
</tt> | |||
If you look there you will see ALMA, CARMA, EVLA, etc, and can set the antennalist input to one of them | If you look there you will see ALMA, CARMA, EVLA, etc, and can set the antennalist input to one of them | ||
Revision as of 19:43, 3 December 2009
Standard Telescopes
Many are delivered with CASA. You need to find your data repository, whose location can vary with installation and operating system.
CASA <10> repodir=os.getenv("CASAPATH").split(' ')[0]+"/data/alma/simmos/"
If you look there you will see ALMA, CARMA, EVLA, etc, and can set the antennalist input to one of them
CASA <11> repodir
  Out[11]: '/export/data_1/rindebet/casa/svn/data/alma/simmos/'
CASA <12> ls /export/data_1/rindebet/casa/svn/data/alma/simmos/
alma.out01.cfg
alma.out08.cfg
...
CASA <13> antennalist=repodir+"alma.out20.cfg"
ALMA
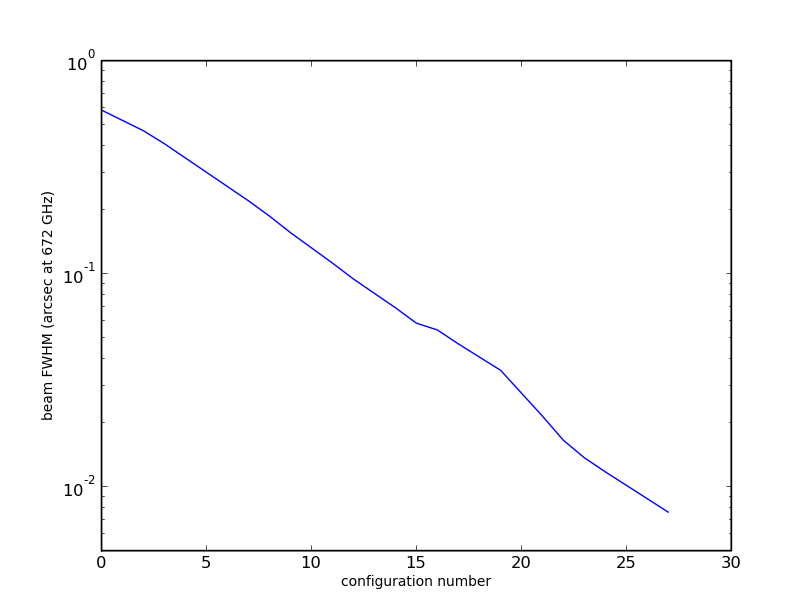
You need to pick a configuration number based on desired resolution. This plot will help:

You can also use this python program: [1] to suggest a beam configuration for you, but you will need to download this table of beams [2] and unpack the tarball in your working directory.
Others, including your own, possibly fictitious Observatory
the configuration files are merely ASCII files with four or five columns: X,Y,Z,diameter, and optional station name. For example for ALMA, the columns are
- UTM-X (Easting; meters).
- UTM-Y (Northing; meters).
- Z (Altitude in meters)
- Diameter (meters). =simdata= uses a primary beam calculated using Airy patterns for the diameters you specify and a 1m diameter circular blockage in the center of each antenna or station. CASA has more accurate primary beams for some observatories, and will used those if available.
The file must begin with header information defining the columns. such header lines begin with "#", and must include at least the observatory name and coordinate system:
- observatory = VLA
- coordsys = XYZ
Some coordinate systems require further definitions to uniquely specify them.
| coordsys | definition | X,Y,Z= | other fields required |
|---|---|---|---|
| XYZ | ITRF earth-centered | X,Y,Z [m] | |
| UTM | easting, northing, altitude [m] | zone, datum, hemisphere | |
| LOC | Local tangent plane offsets from COA | offset east, offset north, altitude [m] | observatory must be in CASA (see below) |
| GEO | WGS84 geodetic not yet implemented | latitude, longitude, altitude [m] | datum=WGS84 |
The next wrinkle is if you are introducing a new array e.g. SKA, some routines in CASA will look for that observatory in the data repository. clean in particular will complain mightily about not finding the observatory. In principle, both simulation and subsequent inversion/clean should work even if the observatory is not present, but WMMV.
If you have write access to your CASA installation, you can add observatories in either earth-centered ITRF or geodetic WGS84 coordinates. As above, you are looking in the data repository, at
obstable = os.getenv("CASAPATH").split(' ')[0]+"/data/geodetic/Observatories"
You need to open that directory in the CASA table browser browsetable, click to make it editable, add a row, and fill in the fields in the row. If you think other users might want your observatory, please contact the CASA helpdesk to request that it be added universally.