Guide To Processing ALMA Data for Cycle 0: Difference between revisions
| Line 24: | Line 24: | ||
# [http://almascience.nao.ac.jp/alma-data/archive East Asia] | # [http://almascience.nao.ac.jp/alma-data/archive East Asia] | ||
{| style="width: 100%; valign: top; background-color:#E0FFFF; border:1px solid #3366FF; text-align: center; cellpadding=0" | {| style="width: 100%; valign: top; background-color:#E0FFFF; border:1px solid #3366FF; text-align: center; cellpadding=0" | ||
Revision as of 20:26, 26 February 2014
Processing ALMA Data
This guide describes steps that you can use to process ALMA data, beginning with locating and downloading your data from the public archive, to making science-ready images.
We will use a sample data set from ALMA Cycle 0 in this guide. Data for Cycle 1 and beyond will be delivered in a different format and will require a separate guide.
About the Sample Data : H2D+ in TW Hya
The data for this example comes from ALMA Project 2011.0.00340.S, "Searching for H2D+ in the disk of TW Hya v1.5", for which the PI is Chunhua Qi. Part of the data for this project has been published in Qi et al. 2013.
The observation was set up with two spectral windows ... frequency/bandwidth/chan spacing/etc
The project required three executions of the scheduling block. explain ...
Prerequisites : Computing Requirements
ALMA data sets can be very large and require significant computing resources for efficient processing. The data set used in this example begins with a download of 176 GB of data files. A description of recommended computing resources is given here. Those who do not have sufficient computing power may wish to arrange a visit to one of the ALMA Regional Centers (ARCs) to use the computing facilities at these sites. To arrange a visit to an ARC, submit a ticket to the ALMA Helpdesk.
Getting the Data: The ALMA Data Archive
The ALMA data archive is part of the ALMA Science Portal. A copy of the archive is stored at each of the ARCs, and you can connect to the nearest archive through these links:

|
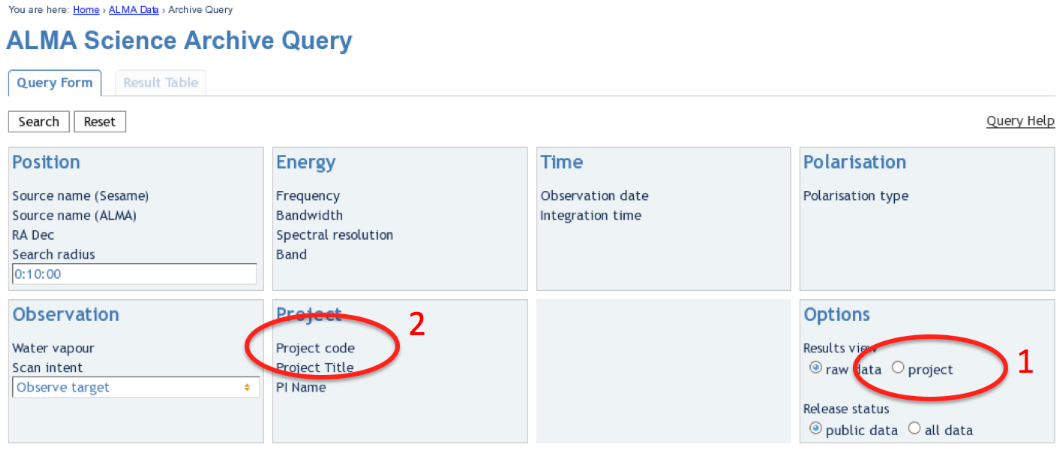
| The ALMA Archive Query page. |
Upon entry into the ALMA Archive Query page, set the "Results View" option to "project" (see the red highlight #1 in the figure) and specify the Project Code to 2011.0.00340.S (red highlight #2). Note, if you leave the "Results View" set to "raw data", you will see three rows of data sets in the results page. These correspond to three executions of the observing script. In fact, cor Cycle 0 data these rows contains copies of the same data set, so use care not to download the (large!) data set three times. By setting "Results View" to project, you see just one entry, and that is the one you'd like to download.
You can download the data through the Archive GUI. For more control over the download process, you can use the Unix shell script provided on the Request Handler page. This script has a name like "downloadRequest84998259script.sh". You need to put this file into a directory that contains ample disk space, and execute is in you shell. For example, in bash:
chmod +x downloadRequest84998259script.sh ./downloadRequest84998259script.sh
Unpacking the data
The data you have downloaded includes 17 tar files. Unpack these using the following command:
for i in `ls *.tar`; do tar -xvf $i; done
At this point you will have a directory called "2011.0.00340.S" with the full data distribution.
Overview of Delivered Data and Products
Describe here the data products and scripts
CASA 3.4 vs. 4.2
Typical approach: Use the delivered calibrated data, and user only needs to do self-cal and imaging.
For those who want to tune the calibration: go through the steps
Refining the Calibration
uid___A002_X554543_X207.ms.scriptForCalibration.py uid___A002_X554543_X3d0.ms.scriptForCalibration.py uid___A002_X554543_X667.ms.scriptForCalibration.py
The delivered data has cal steps 0-6 (a priori) completed. User can pick up with step 7.
Flux Calibration
Note, the scripts refers to the combined data set. Flux cal script does the cal, then combines the 3 cal executions:
concat(vis = ['uid___A002_X554543_X207.ms.split.cal', 'uid___A002_X554543_X3d0.ms.split.cal', 'uid___A002_X554543_X667.ms.split.cal'],concatvis = 'calibrated.ms')
The imaging script will then work with the calibrated.ms